Thursday, February 9, 2012
Reflection 5
Today we learned about the cost of home security. An automated home can be a very simple grouping of controls, or it can be heavily automated where any appliance that is plugged into electrical power is remotely controlled. Costs mainly include equipment, components, furniture, and custom installation. Ongoing costs include electricity to run the control systems, maintenance costs for the control and networking systems, including troubleshooting, and eventual cost of upgrading as standards change. Increased complexity may also increase maintenance costs for networked devices.
Reflection 4
Me and my partner learned that with Home Automation, the consumer can select and watch cameras live from an Internet source to their home or business. Security cameras can be controlled, allowing the user to observe activity around a house or business right from a Monitor or touch panel. Security systems can include motion sensors that will detect any kind of unauthorized movement and notify the user through the security system or via cell phone.
Reflection 3
I learned that a home automation system integrates electrical devices in a house with each other. The techniques employed in home automation include those in building automation as well as the control of domestic activities, such as home entertainment systems, houseplant and yard watering, pet feeding, changing the ambiance "scenes" for different events (such as dinners or parties), and the use of domestic robots. Devices may be connected through a computer networak to allow control by a personal computer, and may allow remote access from the internet. Through the integration of information technologies with the home environment, systems and appliances are able to communicate in an integrated manner which results in convenience, energy efficiency, and safety benefits.
Reflection 3
Home automation may include centralized control of lighting, HVAC (heating, ventilation and air conditioning), appliances, and other systems, to provide improved convenience, comfort, energy efficiency and security. Home automation for the elderly and disabled can provide increased quality of life for persons who might otherwise require caregivers or institutional care.
Reflection 2
I learned how most people invent things from the simple household appliances. Even devices as innovative as smart house security was created by someone who was just trying out something new with left over household appliances. Smart house security makes me think of the movie Home Alone, when the boy used all of his household items to protect himself.
Thursday, February 2, 2012
Day 1 Reflection
We finished the reearch paper and turned it in. I kearned alot about a project called X10. In 1970, a group of engineers started a company called Pico Electronics in Glenrothes , Scotland
Monday, January 23, 2012
Flying toy Videos
http://www.google.com/url?sa=t&rct=j&q=&esrc=s&frm=1&source=video&cd=27&ved=0CF4QtwIwBjgU&url=http%3A%2F%2Fwww.metacafe.com%2Fwatch%2F1139198%2Fhow_to_make_an_electric_helicopter_training_test_stand_part_1%2F&ei=dnQdT4veJ5H4tgfs6ciYCw&usg=AFQjCNEYdJyh_L3GSu8hTl9HOjld2XVpYw&sig2=sDl16cSTdBtb1sdlMyfjRA
http://www.google.com/url?sa=t&rct=j&q=&esrc=s&frm=1&source=video&cd=6&ved=0CGAQtwIwBQ&url=http%3A%2F%2Fwww.youtube.com%2Fwatch%3Fv%3DinN55-5bMnE&ei=1HQdT6HcHMfqtgfhtbilCw&usg=AFQjCNEUDJakJBG_Nriwn0FNrouJZ066XA&sig2=fHBoUwZuI8Cw4TpwaRltYw
http://www.google.com/url?sa=t&rct=j&q=&esrc=s&frm=1&source=video&cd=6&ved=0CFwQtwIwBQ&url=http%3A%2F%2Fwww.youtube.com%2Fwatch%3Fv%3D5DKlIRfUl78&ei=HnUdT8mxLNSHtwfruL2TCw&usg=AFQjCNFK_PjzfHJiINwIyVJ_Vm9Y9Em4hw&sig2=qQbdXuy73qSYpoLTNfzflg
References
Simon Field, Aerodynamics. N.p., 2004. Web. 23 Jan 2012. <http://sci-toys.com/scitoys/scitoys/aero/aero.html>.
. N.p., 2010. Web. 23 Jan 2012. http://games-and-consoles.blurtit.com/q6706675.html.
. N.p., 1999. Web. 23 Jan 2012. <http://www.ehow.com/how_2352236_build-toy-helicopter.html>.
Flying Bug Links
http://www.ehow.com/how_2352236_build-toy-helicopter.html
This website gives specific instructions on how to build a flying helicopter toy. I was a little confused at first because the begging started like this "Soak the tongue depressor in the boiling water for at least 30 seconds. This will make the wood slightly more flexible so you can shape it into a rotor. Remove the tongue depressor from the water with a pair of tongs, and try to twist the stick in the middle. You will want to try to twist one side forward while twisting the other side backward. Hold in position while the tongue depressor cools. You may need to repeat this step a few times. Ideally, you will shape the depressor so one half is angled. If you have trouble bending the wood, try using a file to at least angle the edges." Using a tongue depressor and and boiling water to make a helicopter did not seem practical. The article also tells you how to decorate it without ruining the desigm.
http://games-and-consoles.blurtit.com/q6706675.html
The second post gives a different way to make a helicopter, using aluminum foil, straw rubberband and christmas ornaments.You need a straw one rubberband a christmas ornimat hook and and alluminum sheetind or just card paper also a small sphere shaped beed with a hole in the middle.So you cut the straw the lenth you want your heli,then take the ornimat hook and bend it to make a small hook at the one end,then take your paper or metal sheeting an cut two thin rectangles about the lenth of the straw.bend to make an airfoil on each end then poke a hole in the middle.put your hook in the hole then glue hook a rubberbsnd on the hook you made then fish it into the straw tape the rubber band once you pulled it through then make one mor propeller glue to the bottom wind up and let fly.
http://sci-toys.com/scitoys/scitoys/aero/proptoy/proptoy.html
This website helps when working on the propeller, we cant use this design alone because it does not use batteries or motors, but we can use it in order to build a succesful propeller. To make a propeller the maker suggest we use a block of soft pine, 8 inches long, 2 inches wide, and 1/2 inch thick. The dimensions are not critical. A 10 inch dowel, 1/4 inch in diameter. A drill or auger with a 1/4 inch bit. A wood file or shaping tool, or a whittling knife. Power tools like a drum sander or belt sander make the job go much faster. A drop of white glue. also that the air does not speed up as it moves over the curved top of the wing, but it does slow down as it encounters the tilted bottom of the wing. We can measure the pressures on the top of the wing and on the bottom, and the difference is lift. We get the same value for lift whether we look at the mass of air moving downwards, or the pressure difference between the top of the wing and the bottom, because they are two different ways of looking at the same thing.
Flying Bug Instructions
Fill a small saucepan with water and bring to a boil on the stove.
Soak the tongue depressor in the boiling water for at least 30 seconds. This will make the wood slightly more flexible so you can shape it into a rotor. Remove the tongue depressor from the water with a pair of tongs, and try to twist the stick in the middle. You will want to try to twist one side forward while twisting the other side backward. Hold in position while the tongue depressor cools. You may need to repeat this step a few times. Ideally, you will shape the depressor so one half is angled. If you have trouble bending the wood, try using a file to at least angle the edges.
Apply a small drop of super glue to the pencil's eraser, then stick it to the center of the tongue depressor. Get it as close to dead-center as possible, as this will affect your balance. You could also use a pencil and tape measure to measure and mark the exact center, although just eye-balling it is perfectly acceptable. In place of a pencil, a 1/4-inch dowel rod, about 7 to 8 inches long, will provide good balance for your toy helicopter.
Decorate your helicopter. Use different colored felt-tipped markers to color your toy helicopter with a color and design of your choosing. Color the rotor blade at the very least.
Wrap your sting tightly around the pencil, about one-third of the distance down from the top of the toy helicopter. Use a piece of kite string or nylon cord. A piece 12 to 18 inches long is perfect. Simply wind the string around the pencil several times, leaving a small amount at the end for you to hold.
Cut off a piece of the aquarium tubing that is 3 or 4 inches long, just long enough to hold on to. The tube must have an inside diameter that is large enough for your pencil to drop inside loosely, with plenty of extra room. Use a knife or small drill to make a hole in one side of this tube, near one end. The hole should be big enough for your kite string to fit through.
Position the tubing so the end with the hole is at the top, and slide the pencil inside it. When the portion where you wrapped string around the pencil is inside the tubing, pass the extra length from the end of your string through the hole so the string can be pulled, even though the wrapping is inside the tube.
Hold the handle of the toy helicopter with one hand, and give the string a good pull with the other. You want to pull the string all the way off in one long, fluid motion. As you do so, the helicopter will begin spinning, and when you reach the end of the string, the toy helicopter will leave the tubing handle and fly into the air.
Material List
- Tongue depressor
- Small saucepan
- Tongs
- New No. 2 pencil
- Super glue
- Felt-tipped markers
- 3 to 4 inches of aquarium tubing
- 12 to 18 inches of kite string
Thursday, January 19, 2012
Link Refernces
. Reach out Michigan. N.p., 07. Web. 19 Jan 2012. http://www.reachoutmichigan.org/funexperiments/agesubject/lessons/burglar.html.
. How Stuff Works. N.p., 1998. Web. 19 Jan 2012. http://science.howstuffworks.com/innovation/science-questions/touch-sensitive-lamp.htm.
.Wiki How. N.p., 98. Web. 19 Jan 2012. http://www.wikihow.com/Make-a-Door-Alarm.
Instructions to Build Door Alarm
Making the Alarm

- Disconnect one battery wire from the buzzer.
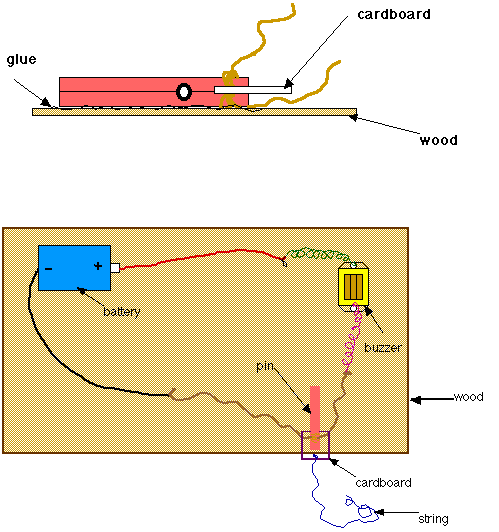
- To make things easier, put the battery and the buzzer on the wood, as shown in diagram 2.
- Use a piece of electrical tape to tape the battery to the wood so that it does not move.
- Get the buzzer and put it at the other corner of the wood and tape it to down, just as in diagram 2.
Now you want a switch that works easily and more quickly, without you having to make and break the connection with your hands. You need a switch that turns on and off the buzzer depending on a door opening or closing. Making a switch that does this will result in a Burglar Alarm Switch.
The Burglar Alarm Switch

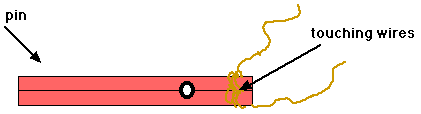
- First, you will need to wrap the ends of the clothes pin with the non-insulated wire or the insulated wire that you have peeled. Look at diagram 3.
- Make sure that the wires touch when the clothes pin closes, as in diagram 4. If the wires don’t touch, then there will be no connection and the alarm will not work.
- After wrapping the wires, connect one of the free ends of the wire to one of the wires coming from the battery.
- Connect the other wire from the pin to the buzzer.
- Connect the remaining free wire from the battery to the buzzer (if you have not yet done so when making the buzzer switch, above).
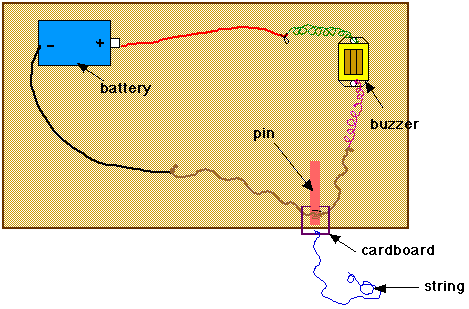
- Note: If you are confused by now, just look at diagram 5 and connect the wires as shown in the picture.
- Test the switch by opening and closing the pin. When the clothes pin is closed, the alarm should sound. If it doesn’t, make sure all the wires are connected and that the clothes pin’s non-insulated wires on the end are touching. If it still does not work, look at diagram 5 and check all the wires again. It should work.
- When it is working, you may want to turn it off by placing a small piece of cardboard in between the ends of the pin so as to open the switch and turn off the buzzer. It is annoying to continue working with the buzzer on. (See diagram 6.)
- With the buzzer off, paste the clothes pin to a corner of the wood using crazy glue (see diagram 7).
CAUTION:
You have to be careful with the glue. It sticks very quickly. Do not touch the glue with your fingers. It might be a good idea to have some nail polish remover handy: if you accidentally get your fingers stuck together, it can dissolve the glue for you.
- Finally, attach the string to the cardboard that you already put between the ends of the pin. When this string is pulled away, the wires in the pin will make contact and the alarm will sound

Door Alarm Material List
- Insulated Wire
- Get 4 strands of wire, each 1 foot in length
- You can find the wires around the house, inside battery-operated appliances that no longer work. Make sure that your parents give you permission to take them apart.
- You can also buy the wires and other supplies listed from a Radio Shack, a hardware store, or the electrical section of big stores like Walmart.
- Note: In order to make this alarm, you will need to peel off the rubber/plastic insulation from two of the wires. Try to peel the wires before starting this lesson. If it is too difficult for you, then you can buy non-insulated wire that does not need peeling.
- 1.5-volt battery.
- Kite string or button-and-carpet thread, 3-5 feet long.
- Scissors
- Electrical tape
- 1.5-volt mini-buzzer
- Spring-type wooden clothes pin
- A scrap piece of board or plywood 4 inches by 12 inches or bigger.
- Super Glue
Door Alarm(Links)
Sensitivity of Alarm
http://science.howstuffworks.com/innovation/science-questions/touch-sensitive-lamp.htm
This article talks about switches that are sensitive to human touch, as opposed to switches that must be flipped or pushed to make and break a mechanical connection have been around for many years. They have advantages, and the most important is the fact that dirt and moisture cannot get into the switch to gum it up or damage it. The human body is generally warmer than the surrounding air. Many elevators therefore use buttons that are sensitive to the warmth of the human finger. These buttons, of course, don't work if you have cold hands. The motion-sensitive lamps you see on people's patios also sense the heat of the human body. The human body, being made mostly of water, conducts electricity fairly well. By placing two contacts very close together, your finger can close the circuit when you touch it.
Burglar Alarm
http://www.reachoutmichigan.org/funexperiments/agesubject/lessons/burglar.html
This website talks about how to use a switch, a battery, and a buzzer switch to construct a home made door alarm. It tells you the steps to make each part. One section has steps for the buzzer. Another section has steps for the battery and circuitry. Another section has steps for using the switch. The article states that a 1.5 volt battery is requitered. A kite string is needed as well. You will probably need scissors too. They strongly recommend electrical tape. You can buy a 1.5 V buzzer from stores like radioshack. You also need super glue, and need to use it super fast because it can stick to you. It also requires a scrap piece of board or plywood.
Door Alarm
This site was the most simple and easy to understand. First you have to place the battery and buzzer on the wood. Tape them down with electrical tape. Second wrap the ends of the clothes pin with bare, non-insulated wire. Third Connect one of the free ends of wire around the clothes pin to a wire coming from the battery. Fourth connect the wire around the clothes pin to the buzzer. Fifth connect the remaining free wire from the battery to the buzzer. Test the switch by opening and closing the clothes pin. When the clothes pin is closed, the buzzer should turn on. If not, check the wiring again. Place a piece of cardboard or other insulative material in the clothes pin to separate the wires so that the buzzer does not go off anymore when it closes. Glue the clothes pin to the wood, as seen in the picture. Attach the string to the piece of cardboard between the close pin things. Attach the other end of the string to your door. Place the alarm so that the string is taut between the alarm and the door. When the door opens, the string should pull the cardboard out, setting off the alarm.
Tuesday, January 17, 2012
Research Projects
T Shirt Launcher(Link):
http://www.popularmechanics.com/technology/how-to/tips/build-your-own-t-shirt-cannon/
http://www.ehow.com/how_2286376_make-tshirt-cannon.html
http://thebigmanual.com/t-shirts/t-shirt-cannons/
T Shirt Launcher(Videos):
http://kipkay.com/videos/explosions-and-loud-things/hi-power-t-shirt-launcher/http://channel9.msdn.com/coding4fun/articles/Coding4Fun-Cannon--Project-Overview
http://www.google.com/url?sa=t&rct=j&q=&esrc=s&frm=1&source=video&cd=1&ved=0CFQQtwIwAA&url=http%3A%2F%2Fwww.youtube.com%2Fwatch%3Fv%3DFgCz7C6jEIk&ei=x4YVT5_bEZT4tgey5Kz3AQ&usg=AFQjCNF88naEf1Xx0DVTS8YIriPusJ8qaw&sig2=pLjyIrxkH4zNrEuD9INStA
Flying Bugs(Links):
http://www.ehow.com/how_5869920_build-rc-flying-bug-robot.html
Door Alarm(Links):
http://science.howstuffworks.com/innovation/science-questions/touch-sensitive-lamp.htm
http://www.geeksaresexy.net/2008/03/03/how-to-create-your-own-laser-home-alarm-system-for-under-20/
http://www.geeksaresexy.net/2008/03/03/how-to-create-your-own-laser-home-alarm-system-for-under-20/
Door Alarm: Video:
http://www.howcast.com/videos/1130-How-To-Make-a-Trip-Wire-Alarm
http:/www.youtube.com/watch?v=iUPz0hXpDI4&ctbm=vid&ei=voQVT_PVMsmTtwfKz-nEDw&usg=AFQjCNFC5f7O8c1EwhNrbSiUMndhEoLr6g&sig2=L5fhw3U6_aHDGurhujQQYQ
http:/www.youtube.com/watch?v=WjoyKOMJ_9E&ctbm=vid&ei=SIYVT8f8B8LMtgevsJT1AQ&usg=AFQjCNG95I5xXKIeXs38iy41_fR1OSp9cQ&sig2=9DdP3w_BDBFvJsI6UNEUnA
Thursday, January 12, 2012
How was blogging?
At some point in the past year or so I lost track of why I started blogging in the first place. It became about making sure I put something up to keep from being removed from a network. Or writing because there was something I was supposed to write about. Somewhere along the line I lost sight of why I write here. I write for me. I write because I absolutely love to write. I like to tell stories. But mainly? I love the community I used to have. The friends I have made. The fun! Blogging for fun. So I’ve been such a busy little bee this past year and I can’t tell you how much of a nerd I have become. My blogging beginning started nearly 5 years ago because a good friend of mine suggested I would be good at it. I thought he was nuts and almost didn’t do it because I couldn’t imagine people would want to read what I had to say. (He was right though)


Tuesday, January 10, 2012
How to have good blog?
you have to provide content that the general public is interested it in. If you have that, tell a friend, that friend will tell a friend... and so on... also, read other peoples blog and comment on their topics. Leave your blog as reference, or if you comment on someone elses blog in blogspot, it will leave a reference to your blog automatically. If you want to know if people are reading you, you can install a free counter. To get more readers, submit your blog to search engines and different portals that welcome you. There are quite a few websites that need new stuff to propose to their subscribers. The main thing for all bloggers should be to decide precisely how to build up the number of Internet guest traffic to the actual Internet site. One of the best ways of increasing traffic flow is through the effective use of search engines, which publish and advertise the most popular web sites on the Internet. In order to get a search engine to put your particular web site near the top of a visitor's search, there are a couple of things that should be done. You should also have very clear texting so that the reader can be able to see all of your text.
What I learrned aboutmy module?
1) I learned about the function of relay logic control circuils and how all automated machines use the same type of controller, which act as the brain for the machine. Controllers generally control the sequence of steps that a machine performs by switching out puts on and off. I also learned the devices called relats determine the proper output based on the inputs. Also relays can be wired together in various combinations to create elaborate machine functions. The six elements of of control logic are AND, OR, NOT, NOR, NAND, MEMORY. An AND logic circuit is made of two normally closed switches wired in a series. AND logic circuits are used as two hand circuits.I learned that switches are input devices that send messages to the relay based control logic. And the OR logic circuit is made of two or more normally open pushbutton switches wired in parallel.
2) A common application of OR logic is a remote-start button
3)

Friday, January 6, 2012
Whats blogging?
A blog is similar to a diary or journal. Blogs are usually filled with personal thoughts, the only difference is that people often read them therefore it is not as private. This is why many people blog anonymously. There arent really any rules to blogging. Its just a website where you just write whatever you want. Many use blogs just to manage their thoughts. You just write what you want and publish your page. The blog design and background is also important in showing readers what kind of person you are. You can follow other people's blog, whether you know them or not. You can also find people by searching for thier blog name. In addition to all this you can access blogs from your mobile device whether it is a cellular phone, ipod, ipad, etc. this way even if you are not home you can still change your blog or read other people's blog.
Subscribe to:
Posts (Atom)